Do-It-Yourself C16 Repairs - A Tutorial By AaronAllen Aaron Allen
I purchased a used C16 to experiment with about a month back because the encoder knobs didn't work right, and ran backwards when used no matter what direction you turned them. The owner originally thought they may just need cleaning like a normal potentiometer would... Actually, this is and is not correct. The encoders Ensoniq chose to use are not pots at all, but are in fact on/on/on stepping switches in a potentiometer-like housing. The common belief up to this point was that these 'had' to go back in to be replaced/repaired. I'm finding that's not the case (at least in my case) if you are brave enough to open the CS16 up and do some tweak head repairs.
Now, here is my standard disclaimer. I will *not* be responsible if you open your unit up and break something in the process, you are on your own... however, this may be helpful to some of you since there is only one place to have these things serviced and having them down/gone for any length of time is not an option. If you’re not comfortable with this repair, then contact The Sonic at 1-408-567-9277. Ask for The (pronounced "Tee") Ngyun.
Now, on with the presentation... This is where it gets interesting!
 I pulled apart the much feared CS16 case thinking "Lord, don't let this be the nightmare I've heard it is to get back together" all the while. I'm pleased to say that knobs, switches, and LED's didn't sproing(!) all over my workspace, the pieces were quite calm about the whole procedure. Any of you that have pulled apart and re-assembled a boom box should be able to handle this with a little patience and a sharp eye.
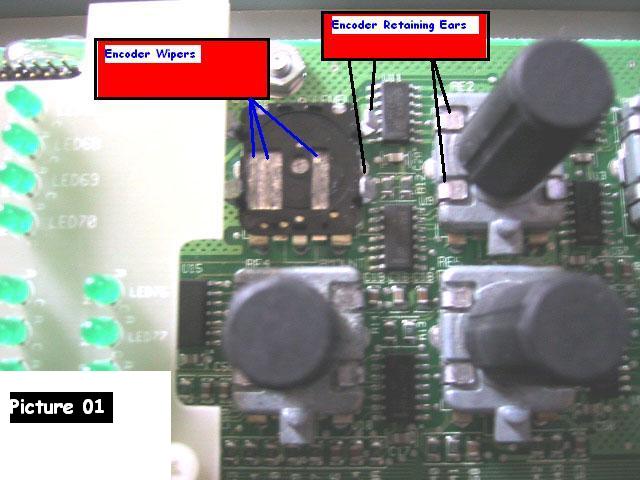
What I found inside was that the encoders are layered switches not unlike potentiometers in build, and there are little metal ears holding them together, from the bottom (PCB side) to the top where the knob sticks out. The retaining ears had become loose on mine, making contact with the internal wipers intermittent. I decided to investigate further.
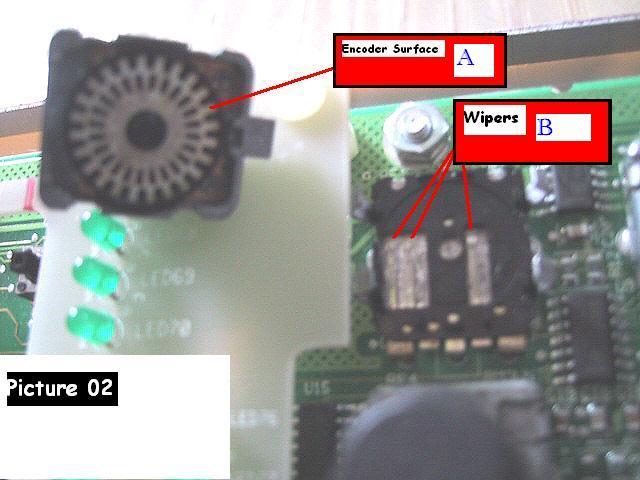
I carefully spread open the retaining ears (see Picture 01) and pulled the main shaft assembly straight up off the middle layer section, revealing what you see (in Picture 02) above and discovered that the knob/shaft surface (A) had become tarnished with metal debris shed from wiping the surface (read: normal use) over time. In fact, the lubricant was now suspending metal particles and had in fact become a conductive gel!!
I cleaned the surface of it, wiped any residue off the wiper arms (B), and used a cotton tip swab to polish the encoder surface to a nice bright shine with a vigorous circular motion. This lifted any residual shavings, trapping them in the cotton fibers while at the same time removing the now contaminated old lubricant.

At this stage I have a clean, disassembled encoder in need of new lubricant. Since I used to repair some years back, I have just the thing lying around here... Tech Spray (Amarillo, TX 1-806-372-8523) Blue Stuff. Any good quality cleaner/lube should do here. I lightly but fully coat the encoder rotary surface and touch a bit to the tips on the wipers (careful, these bend EASY), and for good measure add a touch to the exposed plastic shaft of the encoder as well from the interior side to keep things running smoothly {note: make sure your cleaner/lube of choice is non-conductive and plastics safe!}. Reassemble and crimp the ears back in place with small needle nose pliers and a small precision jewelers screwdriver. Use the needle nose to grab to either side of the now assembled encoder, and use the screwdriver to CAREFULLY push the ears the rest of the way down while holding the assembly in place. Again, great caution here so as not to bend the wipers or slip off the encoder and scrape a trace off the PC board. Do this to procedure to any encoder that acts funny before moving to the next phase. I personally did all mine for good measure and to avoid having to crack the case open again anytime soon. I also cleaned/lubed my faders as preventative measure while in there, again to avoid opening the case prematurely in the future.
Now comes the test phase, will it work? YES, everything is good now!! I suggest finding a non-conductive place (carpet is known for static electricity, bad!) to lay the assembly on to check all functions before going through the patience testing reassembly of lining up all the knobs/LED/switches. I used a book on a wood stool, your mileage will vary as to what’s convenient, just try to be sensible about the fact that you are working on static sensitive components. Fire up Paris with the CS16 running then test the encoders for correct operation. If this passes muster, you want to put the case back together at this time.
Putting the case together proved to be a touch more time consuming that I thought it might be at first. You have to lower the faceplate down on the assembly of LED/knobs/switches carefully and very straight. You’ll have to literally massage each and every switch until none are hanging up. Press down too hard on the faceplate and you could crack the PC board under the switches! Using gravity as a tool, I make sure the only surface contacting below the assembly is the PC board section, 'not' the faceplate section, to help pull the faceplate gently into place as I massage and work the switches down until all is lined up, then put the allen head screws back in. Again, I used a larger book for this purpose. You're done!
Update, 2008. I still have and use this Control Surface 16 unit so I can vouch for the long term effects being fine on any chemicals used in the article.
- AaronAllen Aaron Allen
thanks to Aaron!